Introduction
Installing TrakSim
Running TrakSim
Operating Modes
Calibrate Your Car
Default MouseClick Handler
(Source Code) Distribution notesConfiguring the DriverCons Constants
The TrakSim class API
Building Your Own Track
Track Data File Format -- (Using Less Trig to Draw a Wall)
Example Tracks -- (F1/10 example tracks)Download TrakSim Code (includes Fly2cam DLL & FakeFirmata & HardAta.ino)
(Separate) Download FakeFirmata & HardAta.ino
Original Fly2cam download, also available on GitHub (only needed if you want to make changes)
Download JSSC, also available on GitHub
Download the FlyCapture SDKFakeFirmata Notes
Notes on (Arduino) HardAta
Fly2cam Notes
Troubleshooting the Camera
Starting Up Java in Win10
(Previous year's) APW2 Technical Topics
Enter TrakSim.
TrakSim pretends to be the servos and camera for your car, using the same API as the Java camera and servo drivers, but no car is required. This enables you to test your self-driving code on any computer that supports Java, then when it successfully runs around the simulated track, you can deploy your code on the real thing and (hopefully) it will work pretty much the same. The simulation is not perfect, and it uses processing time that would otherwise be available to your self-driving code, but it makes it possible to fix the glaring bugs without crashing anything more than a simulation (think: video game).
Do not design to TrakSim, design your code for the real world, but TrakSim will help you get there.
TrakSim also has separate constant-speed and stay-in-track modes, so that different teams can separately and simultaneously work on steering and speed control (with TrakSim providing tolerable default behavior for the part the other team is working on).
TrakSim was originally designed to simulate the PatsAcres go-kart track, but now has a "Build Map" function so you can design your own track layouts using a (somewhat crude) text specification file. You can add visual elements like stop signs and traffic lights and pedestrians and other cars, but you must provide images and work out the timing for the simulator. These features are described in the "Building Your Own Track" chapter. There are sample tracks and a sample image file included in the distribution to illustrate the various features.
This program is released as Java source code which you can run in any standard Java development environment. It is designed to work with FakeFirmata (FF, included) to test your autonomous vehicle software apart from controlling any physical car, but also can be used in your car while your software (in LP) is controlling your car's servos through FF. FF in turn works with the "JavaSimpleSerialConnector" serial port implementation (or any other compatible API) to send serial port commands to the Arduino daughter board included with the LattePanda computer, at the same time it feeds the same commands to TrakSim. In a Java development environment other than LP, use package "noJSSC" (also included) to run the simulator as a stand-alone.
New 2018 June 12: I added a ServoTest mode, so if you run the distributed version on LP unchanged, and click in the top edge of the screen to switch to the live camera, it will exercise the steering servos (once). Increase the nServoTests setting and it will also exercise the electronic speed control (ESC), which will make the car move forward (best to do this on a test bench with the wheels off the floor). Speed and steering alternate continuously the specified number of times.
TrakSim was designed for use by programmers writing self-driving code: You know what you are doing. The ServoTest mode was added so that your hardware guy could verify that the hardware works before handing it off to you. I guess you can use it once or twice that way for the same reason, before getting down to what you are here for. Then turn it off. You can do that, the hardware guy doesn't understand code, so it's on by default for him, not you.Our hardware guy couldn't figure out how to use the ServoTest mode, so I reset the default to 0 in this release.
New 2018 August: Notably missing in the first edition of TrakSim was the ability to do lane edges in some other color than white, and more significantly, to add texture to the track to better model a carpeted floor. These improvements are described in their respective sections in The TrakSim class API and Building Your Own Track. I also tried my hand at "blob" detection, which I described here, and added a Pebble specification to simulate variegated (speckled) carpet colors, and a lumination tool to specify uneven track illumination. Sorry, no headlights, but you could do something tolerably close for a stopped car.
New 2018 October: I generalized the curve macros in BYOT so that they are a little smoother and all radii from 0 to 16 are supported, as well as partial curves starting and ending other than on a compass direction.
New 2019 May: I added support for the coefficient of friction and for the driveshaft turns counter we have working hardware for, plus vertical walls like they use in the F1/10th races (and sample tracks that more or less resemble the four F1/10th race tracks so far).
New 2019 June: I added a tiled floor for better location management.
New 2019 July: I built example tracks using scenery from our MSB location, and fixed a bug to support the larger image file. Some of the interior background walls tend to vanish if your car looks at them cross-eyed (see caution); if that's a problem, let me know and I'll try to fix them.
TrakSim is not a commercial product and does not attempt to present a photo-realistic image, but rather that the pixels are comparable to what a real image might look like to the real camera in a physical autonomous car, so that self-driving car software should behave the same. It's pretty rough around the edges -- literally: the simulated track has jagged edges. If you enable the checkerboard option, even the squares have jagged edges, mostly due to round-off error in the computations and the fact that this is all done in ordinary Java and not on some super-fast high-resolution graphics engine. That's not bad, in the real world streets don't have nice straight edges either, and your autonomous car needs to deal with it.
TrakSim is copyright 2018 Itty Bitty Computers and released to the public as open source "as is" and (like every other software product, whether you get it free or pay for it) it has no warranties at all. Compile it with your self-driving code. If you have problems, ask me or fix it yourself. The distributed version ran at least once in Eclipse and seemed to match what the same code did on a real track.
Tom Pittman --> TPittman aatt IttyBittyComputers.com 2019 July 4
The link above is designed to thwart spammers: It has an encrypted timestamp which expires in 24 hours. If you already have my real email address (new this year), use it. Otherwise click this link, but preserve the timestamp. The spammers don't do that and are blocked.
https://www.youtube.com/watch?v=ekz-uFv66JY&feature=youtu.beIn his video Clayton did not set the "D_Fault=false" switch to =true (the next line down from the one he did change), which you might want to do for your early tests, because it lets the car move along the track when you start it.
Clayton did not show how to select a different
example track to run, but it's helpful for this year to use a track with
vertical boundaries (tube-walls). Replace the first line of the supplied
"TrackImg.txt" file with the name of a different track from the
list below it. We will be testing on location in the "MSB" school building
this month, so you might start with one of those.
Once you have successfully installed Eclipse (or whatever else you are using: I will assume Eclipse, and you can make the appropriate adjustments) and it opens -- it's rather slow, just wait -- and you have dismissed the Welcome page, you can start to install TrakSim. Eclipse is not very smart, you can't just point it to the source files and say "Import it." You need to create a new project (from the menu File->New) and give it a name like TrakSim (or whatever, the code doesn't care). It will create a line with your project name in the left panel "Package Explorer" of your window.
Then inside that one project you need to create individually each of the five packages, apw3, drivedemo, fakefirm, fly2cam and noJSSC. I think it starts out with a "default package" which you can delete at the end, after you have something else in there to replace it. On both computers, I unzipped the previously downloaded TrakSim4.zip file into its own folder, then for each of the five package folders one at a time:
I copied the package name -- in Windows, you must right-click choose "Rename" and then right-click choose "Copy" or control-C; in OSX you click then wait then click again then wait again and pretty soon the name highlights as editable (but I think the "Rename" trick also works), then you can command-C copy it.Then in Eclipse I clicked on the "New Java Package" icon in the toolbar (or chose menu File->New->Package) and pasted the name into the empty panel, then chose "Finish".
I right-clicked the new package icon it created, and chose "Import" from the popup menu there. In the dialog open up (select) "General->File System" and click the Next button. Browse to the TrakSim folder you unzipped, choose the folder corresponding to the package you just created, and click the Open button. Check all of the listed ".java" source files (or check the box on the folder/package name on the left to get everything), and then click Finish. Eclipse puts those source files under the new package icon.
In Win10 (I don't think this is possible in OSX) on a lark I tried right-click copying the whole package folder (not using the Rename trick), which gets the folder and everything in it, then in Eclipse (Oxygen) I right-clicked the "src" icon under the project name and chose "Paste" and it created the package and populated it from the original folder -- instead of the three steps above.
In OSX (this may also work in Win10, which is usually smarter than OSX, but I can't test it) running Eclipse Photon, I unzipped the TrakSim folder directly into the Eclipse workspace folder, then when I created a new project with the same name, Eclipse found it and automatically did The Right Thing. Dunno why this never worked before, probably wrong folder names (or maybe the Eclipse development team finally came out of their eclipse).
Then repeat for the next package (total five new packages). Some
of the packages may add a little red "X" to the name (and to some of the
file names inside), but most of these should go away when you finish importing
the code, and the rest of them after you've completed the second phase.
Finally, you need to copy or move at least the "TrackImg.indx"
file but preferably all three "TrackImg.xxx" files into the TrakSim
folder of your Workspace. I did that in the Win10 File Explorer (or OSX
Finder) and restarted Eclipse before trying to Run. Perhaps you can do
it inside Eclipse, but I didn't try.
You still need to add the three FlyCapture DLLs to the TrakSim folder of your Workspace -- that's the two (FlyCapture2_C.dll and FlyCapture2.dll) you got from the FlyCapture SDK, plus the "FlyCamera.dll" included in the "fly2cam" package folder.
The TrakSim DrDemo program will work with the
default LP Arduino code, but for better control of your car on a real track
I recommend installing my "HardAta" version,
which also includes a DeadMan switch and driveshaft turns counter. The
source code is included in the TrakSim distribution, but see the HardAta
web page for installation instructions.
You need to delete or comment out the "System.loadLibrary"
line in fly2cam.FlyCamera.java so the Java runtime won't try to
load it and crash -- that's a whole bunch of exception lines in the console
log -- and Save the file.
You also need open up apw3.DriverCons.java and change "D_LiveCam=true"
(the first in the block of boolean constants) to =false
-- and Save the file. You could also do this on the LP if you are not using
the camera (it might save a few electrons, and thus a few molecules of
CO2, if you care about such things).
If you are new to TrakSim, you might also change the next boolean constant
"D_Fault=false" to =true (and Save the file). This automatically
sets up TrakSim in a sort of self-running mode (FixedSpeed
and StayInTrack both true)
so you can watch it work without writing any car-driving code.
If you are doing this on the LP and it stops immediately and the console
log tells you "Connect failed" (about five lines from the end), it usually
means the camera is not connected properly. You can get around this problem
immediately by disabling the camera (see the third paragraph
in "Phase Two (otherwise)" above), and that lets you run TrakSim while
ignoring the camera.
If you are the hardware person responsible for setting up the car+computer for the software team to write code for, you can use TrakSim (almost) right out of the box to verify that your camera and servos work. First open up apw3.DriverCons.java and change "D_nServoTests=0" to =1. In older versions of Eclipse you may need to open up the drivedemo.DrDemo.java class in the Package Explorer (see the installation instructions above) so Eclipse knows what to run, then click the green triangle button in the Eclipse toolbar, or choose the "Run->Run" menu, then click just inside the top of the window (above the dashed red line), and the camera image should come up and the steering should jerk once to the right, then once to the left. Click inside the left edge of the window below the middle but above the bottom to terminate properly. Look inside the apw3.DriverCons.java class for the line "D_nServoTests = 1," (about halfway down) and change the 1 to 2, then save and run again and the drive wheels will crank up and down also. Be sure to do this on a test bench with the wheels off the ground, so the car does not jump away from you. Change the 1 to 111 and it will repeat that number of times before stopping. If you just want to work the camera and not the servos, click below the marked top edge region.
If you are using TrakSim to develop autonomous car software, read
on, the rest is for you. First turn off the servo test mode:
Look inside the
apw3.DriverCons.java class for the line "D_nServoTests
= 1," (about halfway down, but this is now the
default) and change the 1 to 0, then save it.
The TrakSim distribution consists of a dozen or so Java class source files, which you should compile together with your own self-driving code. You also need a track image data file (the data for PatsAcres Go-Kart track near Portland is included). If you do this on a LattePanda and include in your build the Fly2Cam camera interface (included) and a Java serial port package (we tested it with JSSC) with all the DLLs needed by those packages to access the hardware, you can dynamically switch between running in emulation and running the same code on a real track with white lines taped or painted on the floor to indicate the driving lane.
Included with TrakSim is a tool for converting a text description of a track into the data file it needs to run the simulation, and a text file containing some example tracks. See the description in "Building Your Own Track" for details.
If you compile the DriveDemo program right out of the package without
making any changes, but omit the "TrackImg.txt" file, it should
start up looking at the PatsAcres track from the starting ramp, but stopped.
If it sees the text file "TrackImg.txt" it will read and display the track
specification from that file instead (if it can).
In either case you can click in various parts of the window to control
its default behavior (see "Default MouseClick Handler"
below). Here is the first track definition in the distributed "TrackImg.txt"
file:
When the ShowMap option is true, the DriveDemo program accepts clicks in the full (but tiny) map at the top right as a request to put the car there. If the close-up map is also visible (lower right), clicking in that map will turn the car to face where you clicked. Basically this is an easy way to do a SetStart (see API below). The close-up view tries to center its view on the portion of the track the car is facing, so as it turns, the car will appear to jump around the edges of the view. If your software is not controlling the speed when you click on a map, the simulated car will stop and wait for you to start it again (in case you want to do more than a single click placement). Of course if you are looking at the camera input, any displayed map is meaningless.
If you do not close the JSSC serial port properly, it may be left open and subsequent attempts to restart have on occasion failed until the computer is restarted. It's not the way I do things, but I didn't write it.
Ordinarily you would replace the DriveDemo class with your own code for reading the camera and driving the servos. If you use the same hardware APIs, you can test your code in TrakSim, then run it in the LP with the hardware drivers, with something like the same results. TrakSim also has a mode in which you can dynamically switch between the simulator and the real camera. The wheels are driven (from your software) as if the car is on the track being simulated (so you probably want the car on a test bench with the wheels off the ground, or else unplug the servos or their power).
If you choose to test your self-driving software in LiveCam mode (on the floor, with TrakSim still active but disabled), it helps to have a wireless mouse to click on the hot regions of the screen to change modes. In my neighborhood, urban crowding makes wireless devices extremely unreliable due to bandwidth overloading, so mouseclicks tend to get lost in the noise. I added a hot region in the top left corner that is active on rollover (move the mouse slowly in from the top or left), because mouse position tends to get lost less often. The sequence of steps, which I found unreasonably (but unavoidably) complicated:
0. Start up LP at least once to get the Arduino servo PWM started (it continues to run at the neutral 90-degree setting the DrDemo program leaves it in when it quits).1a. Make sure the camera is fully powered (at first I needed a second battery, because the LP did not supply enough power, but then we got a more robust power supply).
1b. Make sure the alternate power is supplied to the steering servo (the LP can drive it, but the supply voltage notches badly when the servo steps, so you really need it on its own filtered power source). This is easy to forget if it's separately switched. The servo buzzes when the wheels are on the floor but not exactly aligned with the current servo setting. That lets you know it's powered, but it can get on your nerves.
2. Turn on the ESC power switch and wait for its startup song.
3. Turn on the deadman switch. Our ESC emitted a low-level howl before the deadman switch let the PWM through from the LP. After it gets its signal, ours finished its little song.
4. Start the Java program running. To minimize the need for mouseclicks, I ran it with StartLive=true, so it started up in LiveCam mode. Otherwise, click in the upper half of the screen to switch to live camera.
5. If StartLive=true, and if you have added code to the mouseEntered handler to catch that hot corner and tell you software to start driving, then move the mouse around the top of the window to its left corner then down into the hot corner. Otherwise, use whatever signal you have for telling your software to start the car.
6. Be ready to release the deadman switch when (not if ;-) your car runs off the track.
7a. The ESC I was using seemed to think it should stop working if it lost signal, even if the signal was subsequently restored. So to restart the car after you put it back on the track (or wherever), you need to click on the left edge in the lower half of the screen to terminate the program. My rewrite of the Arduino code seems to have fixed this problem.
7b. Turn off the ESC power switch to reset it. You can run your next test from step #2 above, or else...
8. Unplug the camera battery (if necessary), and capture your console log for analysis before shutting down the LP.
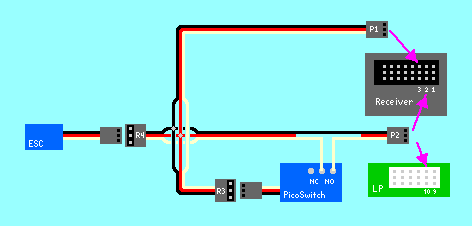
0. The most obvious operating mode for the car is right out of its box, using the remote directly (no computer involved). You probably want to do this for a while, just to get used to what the car is capable of, how fast it goes, what the turn radius is, and so on.After you open up the car, you will see two or more 3-wire flat cables coming out of the receiver. These connect to the steering servo and to the Electronic Speed Control (ESC) and perhaps to other places unrelated to driving the car. If you take the lid off the receiver, you will see a row of 3-pin connectors, each representing a receiver channel (and possibly labelled as such in tiny hard-to-read lettering), where each 3-wire cable with a plug can plug into one channel. The red and black (or brown) wires are power and ground, and the white or yellow or orange wires (opposite to the black, with red in the middle) are the signal that controls each servo.
The Traxxas car we work with has eight receiver channels, but only two are significant: channel 2 controls the steering and channel 3 controls the ESC. The LattePanda computer we work with also has some 3-pin connectors with the same pinouts. The drivers in the TrakSim distribution package are set up to drive these three output channels (9, 10, and 11), and after you have written your software to control them, you can unplug the steering servo from channel 2 of the receiver and plug it into (for example) channel 9 of the LP. Similarly, you can unplug the ESC from channel 3 of the receiver and plug it into channel 10 of the LP. You don't need to use those particular LP channels, but they are what the distribution package is set up for.
We subsequently replaced this clumsy harness with a firmware upgrade in the LP's built-in Arduino, which works basically the same. I call it "HardAta" because in it the Arduino I/O pins are "hard-coded" (cannot be changed at run-time) to the default settings and simple wire harness described here.
1. The first software it makes sense to write controls the steering. Move the servo cable from the receiver to the computer, but leave the ESC plugged into the receiver. Then you use the remote to control the speed, but the computer steers the car. If -- or rather, when -- your software misbehaves, you stop pulling the trigger on the remote and the car stops, no harm, no foul.
2. At the same time, a separate team can work on controlling the speed. This is a little trickier to test safely. We came up with this "deadman switch" using a remote-controlled switch like the PicoSwitch available from radio-control vendors.The steering servo remains connected to the receiver, and you manually steer the car, but your software controls the ESC after you move the ESC plug from the receiver to the LP. However the receiver gets its power from the ESC, and you do not want to short that power to the power supplied by the LP, so you need to cut the red wire that plugs into the LP and route it (and a black ground wire) back to the middle pin of channel 3 on the receiver. When (not if) your software gets confused, and takes off, steering it sensibly may not be enough to prevent catastrophe, so you need a deadman switch in the circuit somewhere. This one is made from two male/female extender cables with power and ground wires soldered together, then the power wire cut near the plug that goes into the LP and the signal out of the LP cut and routed through the switch, as shown in this diagram. The switch has a servo-control cable (or a connector that you can plug a cable into), and that goes to channel 3 of the receiver in place of the ESC plug:
Now your software can control the speed of the car while you steer, but the car doesn't go anywhere until you pull the trigger on the remote. That only enables the software signal to get through; let go of the switch and the car stops.
You can test your harness without a computer in the circuit: Instead of plugging the (modified) ESC cable (P2 in the above diagram) into LP servo driver #10, plug it into the steering control of the receiver (channel 2 on our Traxxas receiver). Then you can control the motor backward or forward using the steering knob on the transmitter, but the deadman switch is still controlled by the speed trigger, which must be activated before the steering knob has any effect on the ESC.
3. Both at once, when your two teams are ready to merge their software products, you leave the deadman switch in the circuit, but move the steering servo cable over to #9 on the LP. You still need to pull the trigger, but otherwise the computer controls the car.
We also found that the current draw by the car's steering servo plus the camera (plugged into the computer's USB3 port) together exceeded the current capacity of the power cable to the LP, so that the steering steps spiked the supply and killed the camera. We solved the problem by isolating the servo power (the red wire) from the computer and giving it its own filtered power (a second battery).
Notice that there is no TrakSim in any of these operating modes. How
do your two teams debug their work on the same car? You can run TrakSim
anywhere, and it pretends to be both the servos and the camera (not shown
in the above diagram), so both teams can develop their software on the
computer(s) of their choice, then move to the LP driving the actual car
after they are confident in the code. Notice the parallelism:
4. Run TrakSim with both FixedSpeed and StayInTrack set to true. The simulated car runs around the track and your software can look at the generated images and issue servo controls (and if you are running on the LP, the servos will actually operate -- you might want to try this on a test bench with the car up on blocks so the wheels are off the ground), but the servo controls have no effect on the generated image.Finally, if you have the manpower to spin off separate teams to look for other issues in the image -- stop signs, crosswalks, pedestrians (an in-scale doll hanging from a fishing pole held over the real track) or even other cars, they can run in operating mode #4 using the artifact feature of TrakSim to test their recognition code.5. Run TrakSim with FixedSpeed set to true, but StayInTrack set to false. Your software controls the steering servo, but TrakSim controls the simulated speed. If your software tries to control the speed, the ESC will respond to your software, but the simulation will ignore it, so you might want to do this up on blocks, or else with the car battery unplugged (the steering servo can run directly off the LP power).
6. Run TrakSim with StayInTrack set to true, but FixedSpeed set to false. Your software controls the simulated speed, and TrakSim keeps the simulated car in the track. This mode only makes sense using one of the generated tracks, not with a live camera, because TrakSim cannot see any live camera image.
7. Run TrakSim with both FixedSpeed and StayInTrack set to false. The simulated car runs around the simulated track directly and solely under the control of your software, but you can do this on any computer and not tie up the actual car to run your testing. Each team can be using a prior revision of the other team's code while testing their own current code, so to work completely in parallel.
Set the unmodified R/C car at one end of the track, and drive it using the remote as slow as it possibly can go at a steady rate (this may take some practice), and time (with a stopwatch) how long it took to do the measured interval. Divide the measured "park" distance by the number of seconds to give you the minimum speed (fMinSpeed) in park meters per second. Listen carefully to (or record) the sound of the motor as it goes this minimum speed, because you want to reproduce the same pitch when the car is up on a block for the next part of the calibration.
Then, with the LP installed and controlling the servos, place the car up on a block so the wheels are free to turn, and set the StartInCalibrate=true mode. When you start TrakSim, notice the blue "S" in the center grid cell on the screen with the pink "-E-" below it and a black "0" above it. So long as you click in that row of grid cells, you can directly change the steering servo (blue "S"), or later, the ESC when the center grid cell shows a blue "E" and the black number represents the actual servo setting in each case.
Click in a cell to the left of the blue "S" in the center in the middle row of boxes to steer the wheels to the left: click farther to the left to jump quickly, and close to (but not in) the middle to move only one step. The servo on the car we used tended to buzz when driven past its limit, so you can listen for the buzz then gradually step back toward center (click to the right of center) until the buzz stops. You can read the current setting (it will be a negative number) in the black number above the middle of the screen. Write it down, then click in the middle of the row to re-center, then jump to the right and find where its limit is, and write that down. You will later enter both numbers as positive integer values for the LeftSteer and RiteSteer parameters in class DriverCons.
Now click below the center row of boxes on the pink "-E-" to switch to the ESC calibration. The "E" is now blue in the center box (the active calibration mode). Click slowly, one click at a time, in the first box to the right of center in the center row, until the wheels start to turn with about the same sound as the minimum speed of the car on the floor. Write down the ESC setting from the black number above the middle of the screen. Now step the speed up until it stops going faster, and then back the setting down until you can hear it slow down (the tone goes lower: you might get a musician to listen for it). That will be the MinESCact and MaxESCact parameters in class DriverCons.
Click once more below the center row (on the pink "-0-") and the motor should stop. Click at the left edge below that same center row to quit TrakSim, so you can make the required changes to class DriverCons. Also turn off StartInCalibrate.
Now when you start TrakSim back up in its default settings (except of
course for the calibration changes you just made), you can look to see
if the speed given in meters per second in the number behind the steering
wheel corresponds to the number of track squares going by in one second.
If it's too fast for you to count visually, you can read the console log
after a few seconds of run, and the lines tagged "(..BF..)" will
have a copy of the information on the bottom edge of the screen. You should
verify the numbers for reasonableness.
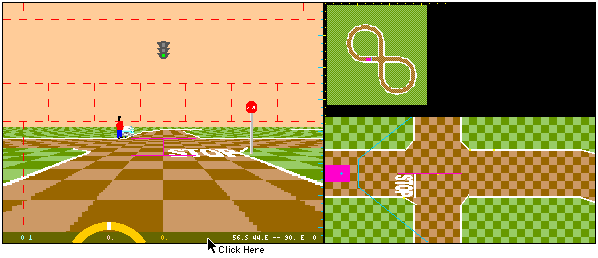
On top of the generated driver's view of the track you also see a pink sideways "H" in the middle, some blue tick marks down the right edge of the scene, a grid of red lines, and two views of the map to the right. TrakSim made the driver-view image and the (one or) two map images, but the rest of the visual information is added by DrDemo in the DrawDemo() method. Its purpose is to demonstrate some of the TrakSim API methods described elsewhere, and you can disable its call with no adverse effects on TrakSim operation.
You might, however, consider leaving the red grid up until you get your own software working and under your own control, because it outlines hot regions of the window which you can click on using the LattePanda touch panel or an ordinary (USB) mouse, thereby to control the operation of TrakSim. It is especially helpful if you are running on some other hardware without an attached camera, and you need to be able to start the simulator on command.
There are five horizontal strips of rectangular regions, each with a different significance, and the individual rectangles within those strips distinguish parameters for those operations.
The center row of seven boxes just above the horizon can be used to steer the simulated car in the absence of self-driving software. It is also used to calibrate your steering and drive servo ranges (see StartInCalibrate). If you have a camera connected and recognized by the FlyCamera class used by TrakSim (and the LiveCam setting is true), then clicking anywhere above this center row switches the primary image source to that camera and pauses TrakSim. You would use this setting after testing your drive software in TrakSim, when it works and you want to test it on the live camera and servos. The servos are active in any case; activating the live camera only changes the source of your image. Clicking below the horizon reverts back to the TrakSim generated image. You should not click at the top edge of the window unless you want the car actually moving (which it will do in the ServoTest mode).
Notice that there is a narrow strip marked off on the left margin of the region just below the horizon. If you click in that region, the program will terminate gracefully -- most importantly, it will close out the serial port, which the third-party API (or perhaps the Win10 operating system itself, I don't know which) is not smart enough to recover from just quitting, so you sometimes need to reboot the computer to recover from leaving the serial port open.
There is a small square region in the top left corner. I used roll-over (mouseEnter) into that corner from outside the window to start the car in live-camera mode after everything is set up properly, because clicks from a wireless mouse are unreliable in my geographical region of Oregon, and I didn't want the car to take off with a wired mouse still attached. Apparently the mouse location is much more robust than the clicks. If you use the deadman switch to stop the car, the ESC will (quite reasonably) refuse to resume until the PWM from the computer returns back to neutral. You can do this by quitting and restarting the program, or the default mouseClick handler lets you click in this corner to stop the ESC drive (and also to call whatever methods your code has added for recovery).
The bottom row should also be marked off, but isn't; clicking in the left half of the dark brown "dashboard" (but not in the corner) will single-step TrakSim (one frame) or pause it if running, whereas clicking to the right of the middle will start it up at frame rate. Notice that the steering wheel is off-centered to the left; the middle of the frame is marked by an orange number representing the current timer value ("0." if you have not started the timer). The diagram above shows where to click to run. I think the hot region at the bottom stops short of the bottom of the image, so if clicking doesn't do anything, try clicking near the top edge of the brown dashboard region.
Other regions of the screen can be used by your own software if you so choose. Or you can provide your own grid, see NewGridTbl in the TrakSim class API.
If the park map is showing, and you click on the map, the car avatar will be placed at the coordinates you clicked on. If the partial close-up map is showing, right-clicking on that map has the same effect. Left-clicking on that map points the car towards where you clicked.
Centered behind the steering wheel is the current speed in park meters per second (double it for miles per hour, or divide by eight for the scale model actual speed). The far left is the steering servo control value (in degrees clockwise from zero), next to it is the current frame number. The far right is similarly the speed servo control value, and to the left of that is the current position and heading.
As distributed, TrakSim is set up to run at constant speed (FixedSpeed=true)
and to stay in the track (StayInTrack=true).
When you click in the bottom right (but not in the corner), TrakSim will
move the simulated car along at the specified fMinSpeed.
If FixedSpeed=false then your
self-driving software must tell TrakSim how fast to go. TrakSim is not
very smart about keeping your car avatar in the track, it just looks at
the edges and sort of picks the car up and sets it down in the middle of
the track, facing approximately parallel to the sides. Your software should
do much better from the image analysis, but if you have separate teams
working on steering and speed control, the StayInTrack
mode should let you test the speed control part in parallel, while the
other team uses the FixedSpeed
mode to test their steering.
Also included in this folder are three data files named "TrackImg.xxx"
where ".xxx" is respectively one each of the suffix/file types
".txt" and ".tiff" and ".indx". You know about
text files, and this one is a collection of example track descriptors described
and explained in "Building Your Own Track".
Similarly, the Tiff file is an image file used only if your track has artifacts,
again described in "Building Your Own Track".
Both of these are optional, needed only if you want to build your own track,
and if you want the track you build to have artifacts other than just track.
The index file is a required default track definition resembling the PatsAcres
go-kart track near Portland, but which you could replace with your own
default as explained in "Building Your Own Track".
These three files must be in the Java project folder for TrakSim to see
them.
Next: Configuring the DriverCons Constants
Rev. 2019 July 4