This document is about the thinking that goes into one aspect of
presenting a visual scene from the car driver's perspective. It is not
necessary to understand any of this in order to use TrakSim, but it might
be helpful if you want to modify it or write your own.
Building a background scene (trees, buildings, walls) behind the track was in the original TrakSim plan, but the trigonometry got really messy, so the first version had only default backgrounds. The trig is still messy, so messy I'm having trouble keeping it in mind while I debug it. That's what this document is for, but you might find it interesting. Or not.
Artifacts within the track area are assumed to occupy a single grid cell, and the car can view them from any plausible direction, so they have view angles and separate images for each direction. If the object has a specific orientation (like a car) and the view angles are too wide, then near the edges of a view it might appear cocked at an odd angle. All you need to do is supply more images with a finer degree of resolution, no additional code needed.
We can do different views for walls too, but mostly the tracks we are modelling have smooth walls that look the same from any angle (except for the perspective). It's the perspective that gets us. After several false starts, I decided to build an array indexed by horizontal screen pixel position, where each element of the array identifies a particular (straight) wall segment and a particular horizontal offset into its image, with the scale factor to be applied to that vertical column of pixels in the image. This array is built in layers, so that near walls can partially obscure more distant walls (two layers of image walls for now). I tried building that array on the fly, as each wall's grid cells came up for floor rendering, but the perspective got too messy, so now I work through the whole array of walls after the floor has been rendered, and before the artifacts are rendered. The assumption is that any part of any artifacts behind a wall are not visible (they get cut off rather sharply, rather than being properly masked by the edge of the wall image, sorry about that), and likewise for multiple layers of walls. This is mostly not a problem, as the track walls being used in the race tracks laid out by the F1/10 group can only be seen around at their ends (see the F1/10 example tracks, links TBA), and artifacts can only be partially visible behind walls where the track has kinks and turns.
Only the front of an image wall is visible to the simulated car. If you want a thin wall separating two lanes or portions of the track -- so that it can be seen from both lanes -- you need to overlay two walls facing in opposite directions (see the F1/10 example tracks). We also support special cases where a wall ends with an end cap, with different view angles which wrap around to resume the track in the opposite direction (as in the Turin example track). That's the easy part, and it works more or less the same as displaying an artifact.
The hard part is how to display a segment of the wall in perspective without doing a bunch of math on every pixel. We could do that in a GPU (Graphics Processing Unit, a special computer that does very fast image processing inside most modern personal computers), but it takes the program out of the range of simple Java. Bit-shifts and (both integer and floating-point) adds and (usually) multiplies are pretty fast (one-clock cycle) in modern pipelined computers (anything that runs Java), but divides are more costly, and trig functions and square roots are library calls with serious overhead time. We want to do those kinds of computations once for a whole wall segment, then render the individual pixels with one-cycle adds and at worst single-dimensional array lookups (only one multiply for each column of pixels).
The simplest case has the car facing some compass direction (say, north) and the wall perpendicular and in view. We need only calculate the distance to the wall, which tells us which raster line to start rendering the base of the wall image on, and also the step rate through the image pixels, both horizontally and vertically. Notice that for speed we step through the image pixels with no blurring across fractional pixels (which takes a couple of multipications for every pixel, the second of which will stall the pipeline, or at least slow it down). We have a nominal focal length of the camera lens, which is some multiplier on the normative 50mm lens of a 35mm camera. The ratio of lens focal length to object distance determines how big the image is on the film, which we calculate in pixels. So a 50mm lens (which is 5cm from the film plane in the camera) viewing a one meter object at a distance of five meters will image that object on 1cm of film (or in our case, CCD sensor chip), it's just a ratio of focal length to distance. At two meters, the one-meter object fills 25mm (one inch), which is approximately the narrow dimension of a 35mm frame (the other 10mm are used by the sprockets). So with the normative lens on our camera, a meter stick held vertically two meters away approximately fills the vertical height of the image plane, perhaps 480 pixels tall (assuming that is the CCD camera resolution). All the rest of the math you find on the internet about field of view is irrelevant, it's just the ratio of object size and distance and lens focal length. Put a meter stick at a known distance, then count the pixels it fills, and you have your multiplier.
You don't need to know the actual focal length nor the actual CCD array cell size, or anything like that, just take a single measurement once, and then do the math with the calibrated multiplier. I suspect our meat-space brains do the same thing using NN-style learning (thousands of guesses, followed by actual measurement, or at least right/wrong evaluations). Figuring out how far the wall is, and how close you can get without crashing into it, is something you can train a NN to do (with thousands, or at least hundreds of training runs). Figuring out how to do the track without crashing into the wall is something a designed program can do in one (or none) "training" run (you did that last year). Figuring out the fastest possible way to do this particular track takes the NN thousands (not hundreds) of training runs on this track, but your designed program can still do it with one "training" run. Human race drivers are trained the way your designed program would work (logic and math, not thousands of crashes), so one leisurely trip around the track before the race is all they need. That's your secret sauce (see Tech Topics Part 11).
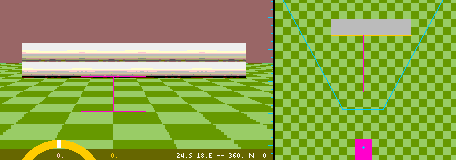
As shipped, TrakSim (optionally) overlays a one-meter square checkerboard on the track to give some perspective to the otherwise plain scene. The F1/10 track walls are two rows of 4" (10cm) dryer vent hose, for an actual height of 20cm, or scaled (1:8) 1.6m. At a scale distance of 16m (16 checkerboard squares, 2m -- 80" -- actual distance on the floor), that wall should fill something like an eighth of the vertical screen. TrakSim ships with a wide-angle nominal 35mm-equivalent lens (or maybe a little shorter) but for racing you probably want to set the focal length out to make distance measurements more accurate -- here I used 52mm -- but different focal lengths (and/or distances) will give different results. The camera should see something like that with the car facing the wall 16 park meters (16 checkerboard squares = eight grid units) away (as shown here). Closer is proportionately bigger, farther is smaller. Changing the lens focal length should have the same effect, but I'll leave that as an exercise for the student.
What computations must we do to display this wall correctly? We have
the car and wall (end) coordinates in park meters. That gives us the distance
from the car to the wall (as placed in the track spec file) at 15 park
meters. You can see that by counting grid squares in the close-up map above
right. Both the car and the wall can be pointed in arbitrary directions,
so we cannot just difference the north-south coordinates to get the distance,
we use the Pythagorean formula, the square root of the sum of the squares
of the vertical and horizontal offsets.  That gets us a radial distance to the corners, but not the normal (perpendicular)
distance to the near point in the middle, which is where the horizontal
image of the wall must be drawn in the straight-on view (as above). To
correct for the greater distance of the wall end-points, we need some trig,b=a*cos(C)
where ais the radius and C is the angle of deviation from
straight-on to the corner of the wall, as seen from the car. The deviation
angle is computed as the arctangent of the distance from the car to the
corner coordinates, less the angle the car is facing (which TrakSim already
knows so it can point the car correctly, no extra computation needed).
That gets us a radial distance to the corners, but not the normal (perpendicular)
distance to the near point in the middle, which is where the horizontal
image of the wall must be drawn in the straight-on view (as above). To
correct for the greater distance of the wall end-points, we need some trig,b=a*cos(C)
where ais the radius and C is the angle of deviation from
straight-on to the corner of the wall, as seen from the car. The deviation
angle is computed as the arctangent of the distance from the car to the
corner coordinates, less the angle the car is facing (which TrakSim already
knows so it can point the car correctly, no extra computation needed).
Once we have the distance b to the wall at the centerline, we can apply the proportionality determined by the focal length of the lens to convert the image height and pixels per meter (two of the parameters for every image in the image file) to determine how many pixels tall its image is in the presentation. In TrakSim, we never calculate the on-screen height, we only develop a ratio, screen pixels per image pixels, then step through the file image at that rate for each screen pixel. Closer objects step more slowly through the image file (replicating pixels as necessary), farther objects more rapidly (skipping pixels). This makes jagged edges, but it's very fast. The rasterizing starts at the bottom of the image, and for each image column of pixels, works its way up until it reaches the top of the file image. In this simple example, the pixel ratio is the same for every pixel column, and is similarly applied horizontally.
The bottom of the file image is displayed on a raster line corresponding to the distance the object is from the viewer, using a table lookup to convert object distance to raster line. The table is constructed at the beginning of the program, and rebuilt whenever the focal length of the lens changes (TrakSim lets you do that, but the low-cost fixed-focus lenses used in most computer-controlled model cars do not actually zoom in or out).
What happens if one end of the wall is closer than the other end? We actually have that in this example, and we have chosen to ignore the difference, that is, to portray the wall as straight-on, because where the wall crosses the center of view it is perpendicular. This makes sense, even if the wall is off to one side -- imagine in the example above, that the wall is only half its length, all on the right, so the center of view line misses its left end by one meter -- we still draw the rest of the wall exactly as if it were full size. So we need to determine where the virtual wall (extended if necessary from either end) crosses the center of view, and what angle the wall makes with the perpendicular there.
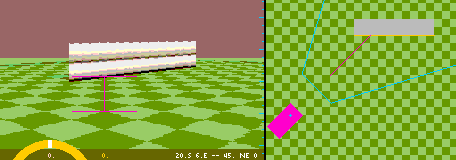
In the more general case -- here I moved the car to the left and turned it 45 degrees to the right -- we have two calculations to make. We imagine the wall as infinite length (not all visible), and we need to calculate where it crosses the center line of visibility (the magenta ray in the close-up map) which defines how far it is, and therefore a base scale factor to use in stepping through the pixels of the image. Then we need to know what angle the wall makes with that perpendicular, which will determine how much the wall grows or shrinks as we move stepwise out from the center. The proportionality should be preserved, that is, the closer end should be bigger and the farther end smaller.

However the right angles are now gone, but there is a "Law of Sines"
I found on the internet -- I do not remember any such law from when I took
trigonometry in high school, but that was a very long time ago, and 97%
of what I do in programming involves little or no math at all (let alone
trigonometry) and most of the remaining 3% has been in the last two years
-- but the rule says that each of the sides of any triangle divided by
the sine of the facing angle is equal. So given any two angles and the
side facing one of them, we can calculate the length of the other facing
side, a/sin(A)=b/sin(B)
or b=a*sin(B)/sin(A)
. We know side a is the Pythagorean distance from
the car to the corner of the wall. Angle A is the difference between
the specified angle dd for the wall (in this case due east,
90o) and the angle the car is Facing
(45o, see GetFacing
in the API). Angle C is the deviation
off the center view line to that corner of the wall, which we previously
calculated using the arctangent of the coordinate differences. The sum
of the three angles is 180o so angle
B is easily determined, with the result that the center-view distance
b can be calculated from the Law of Sines.
The same scale factor should be applied to all points of the image along the (orange) perpendicular as it was in the first case, but (except for where the wall crosses the center line) all the other points are either nearer or farther, and therefore must be proportionately increased or reduced in size. The proportionality can be determined by the ratio of the distance from the car viewer (the blue plus in the diagrams) to the wall (e+f), which is the Pythagorean distance a previously calculated, compared to the distance (f alone) to the perpendicular, which is the hypotenuse of the right triangle of which bis the cosine of the deviation angle C. This can be calculated once for each endpoint, then scaled linearly along the whole wall. However, because the step rate through the file image varies proportionately with the distance, the displayed image size varies inversely to the distance, which makes longer oblique wall segments sag in the middle -- think about it this way: the formula y=kx graphs as a straight line, but y=k/x graphs as a hyperbole. Eliminating this effect costs an extra divide operation on each pixel column.
The Law of Sines fails in the common track driving situation where you are driving a lane that follows a wall on the right or left, which exactly parallels the driving line, so angle A is zero, and you must divide by sin(0)=0 to apply the Law of Sines. In that case, distance b to the wall along the centerline is infinite, and none of the other calculations work. Since the car and both ends of the wall segment are all necessarily on the map, we can compute the Pythagorean distance to the two wall ends without respect to the centerline. If the car is crashed into the wall, one of those distances might be zero, but it's still computable without dividing by zero. A near-zero distance means that the pixel step rate is similarly near zero, which is computationally feasible, but visually foolish (and therefore disallowed).
Regardless how we calculate the height or base raster of the segment ends, if we do this consistently for all the segments of an enclosed track boundary wall, then the ends should line up. However, it is conceivable that two wall segments meeting in a corner might both have face lines passing through the view center line, and unless the corner itself is on the centerline, one of the wall segments will be behind the other on the virtual centerline, and therefore a different base size. The math should work out so they come out equal at the corners. The nice thing about moral absolutes (like mathematics) is that if there are several different correct ways to do a computation, they all must give the same answer. If you get different answers, then one or more of the methods is wrong (or you made mistakes following it). That's why modern science (which is based on unchanging mathematics) became possible in a culture where people believed in moral absolutes, and nowhere else ever. It's really easy to make mistakes in the math, I did it often in this program.
Rev. 2019 April 1