Another very useful function of Arduino is to decode input signals (such
as the "RPM" signal from the car's transmission) and
pass that on into the LP so that the control program can know the actual
car velocity. A little more cleverness inside the Arduino, and it could
optionally route the incoming signals from the radio receiver directly
to the car's servos for an immediate "out-of-box" experience (radio control
of the car) without changing any wiring, just a control parameter to the
Arduino from the Java code in the LP. When we scale up the APW
program to other cities, it's important that novice users -- and their
mentors -- get a positive experience with very little opportunity for things
to fail. Then they can add their own code and know that if it doesn't
work, it's their code, not ours![]()
If you aren't familiar with FRC, here it is in a nutshell. Basically, teams build robots to complete challenges and compete against other robots. The robots built are big, heavy, and must move very quickly and efficiently in order to be successful. Oftentimes computer vision is included in the FRC challenge in the form of reflective tape, which can be viewed by a camera surrounded by a light source. The cheesy poofs, a world champion team, did a lecture on how they implement computer vision on their robot, which I would highly recommend watching. Some ideas covered that I think pertain to APW:- A ton of computer vision happens before the actual vision part. The very first step in detecting reflective tape is reducing the camera exposure, turning your complex blob filtering algorithm into a simple one. We didn't mess very much with camera settings with pedestrian detection, and I think it would be a good idea to cover that stuff early on so that when it comes time to fiddle with the settings we know which knobs to turn.
- There are two main problems with directly feeding pixels off center into a PID machine:
- Latency: Since FRC robots move ridiculously fast, the time taken to transfer and process the frame is too long, as by the time the processor spits out an error the robot has already moved from where the frame was taken, causing the error to overcorrect. They solve this by measuring the robot's change in position using other sensors, then applying that change in position to the detected reflective tape and calculating an error from there. This may or may not be a problem for since we are not constrained to speed.- Units: Pixels off center is pretty close to, but not quite, degrees. If we are using a slow moving robot and a simple control system units will probably never become an issue. However, if you want to do the latency correction above, or more complex trajectory control, you need an (x,y) target. Fortunately, this turns out to be pretty simple: If we assume that every object we are detecting has a fixed height off the ground (such as a painted line on the road), given the properties of the camera we can solve for the world position of the detected object. The lecture details this using the pinhole camera model at 30:41.
- They don't cover this in detail, but this same FRC team has a system for driving a robot given a set of waypoints using trajectory control as an alternative to PID, which would be far more complex but more effective (less drifting and spinning out) at higher speeds. It would also mean, however, that camera data would be returned in the form of waypoints: something much easier implemented at the start of the project, as we learned last year. I for one, would like to see the car move fast, but you guys know better than I do if something like that is realistic.Let me know if you have any questions. I'm looking forward to the start of APW!
Thank you,
Noah
As the car speed increases, you will begin to notice the effects of
how long it takes your software to process the incoming image before you
tell the steering wheels which way to turn. You cannot do sharp turns on
the track at high speed, not only because the car might spin out or roll
over from lateral acceleration forces, but also because your software cannot
respond quickly enough. This is why race tracks have no sharp turns. As
you extend your car control towards higher speeds, you need to adjust the
planning that goes into steering it to accommodate the increased effects
of latency. If your programs sees a sharp turn coming up, you probably
want to decelerate the car going into the turn. Speed analysis is
an important part of making your car more sophisticated.
1. Initial image processing2. Steering analysis (including PID)
3. Speed analysis (possibly with reference to a map model)
These are some tasks that may or may not deserve separate working
group support, but you should think about:
6. GitHub repository
It looks like we have enough participants, and there are some interesting
tasks that can be worked on in parallel, then integrated after the basic
car functions work properly:
9. Building & tracking a "3D model" of the track for predictive steering and speed control10. Adjusting the speed for the processing latency (slower for tight turns, faster for straight)
11. Predictive steering, so the car drives more smoothly
12. Detecting a stop sign and stopping at the right place
13. Inferring implied lines from parked cars or other non-traffic lane objects in the scene
14. Staying an appropriate distance behind another car in the same lane
15. Making turns (from a script?) when there are choices
16. Passing another car in the road (probably need extra hardware, like another camera)
17. Parallel parking (probably need extra hardware, like more cameras)
18. Create website for showing off in Belgium & expansion beyond Portland
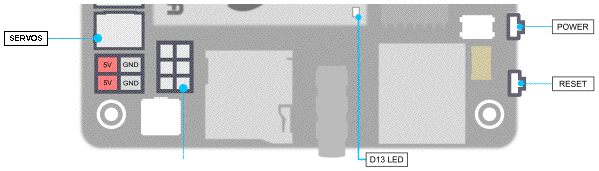
On the near right corner in this diagram are two tiny buttons facing
outward from the board. The second one in from the corner is labelled in
the diagram as "POWER" and is used in the power-up
and -down sequences. On the opposite corner is a little block of four pins
sticking straight up, shown here as red and gray. This is where the battery
power comes in. It should already be connected in the system you get. Extending
along the edge away from the power connector is a line of six 3-pin servo
connectors, but only the far three (not shown here) are outputs. They are
not keyed, so you must be careful to ensure that the black (or brown) ground
wire of each servo cable is closest to the edge, and the white (or yellow)
signal wire is closest to the metal plate covering the CPU.
There is a blue LED in the corner of that metal plate,
which displays "D13" of the Arduino output, under the control of the LP.
1. Supply main power (plug in or switch on battery, or plug in wall dongle). The blue Arduino "D13 LED" and the red pilot on the back side will both come on bright, but the Arduino LED will flicker some and then go dim.2. Wait for the red pilot light to go out on the bottom side of the LP board (about a minute or so).
3. Press the LP "POWER" button.
4. Wait for the Win10 welcome screen (another couple minutes) & log in. Then the LP is ready to use.
0. Turn off the ESC switch first. All the LEDs in the car (below the computer deck) should go out when you do this.1. Press the LP "POWER" button. I have it programmed (in Win10) to Hibernate, which is faster than Shut Down. The screen will go dark immediately, but the hibernation process (or shut down) takes a minute or two, with the red pilot light on the bottom side of the LP board still on.
2. Wait for the red pilot light to go out on the bottom side of the LP board. The blue Arduino LED (if you left it on) will remain on, because the Arduino continues to run as long as there is power.
3. Remove power from the LP by unplugging the battery, or if there is a switch, turning the switch off. If you have separate batteries for the camera and servos, unplug them too.
4. Traxxas warns that the big motor battery should also be unplugged when you are done for the day. This would also be a good time to recharge the battery.
0. Make sure the car is properly positioned on its track, or else up on blocks with the wheels clear of obstructions.1. Power up the LP (see above) and make sure your software is up to date.
2. If power to the camera and/or steering servo are separately controlled, turn that on next.
3. After you power up the LP, you must run your code at least once to initialize the Arduino PWM. You may find it necessary to terminate this first run before continuing with Step #4.
4. If the motor battery was unplugged, plug it in. Turn on the remote transmitter.
5. Turn the ESC switch on and wait for it to sing its little song. It will start to whine until you press and hold the "deadman" switch (remote transmitter trigger). If it continues to whine, it may be that the LP+Arduino did not start to provide a PWM signal (Step #3). Otherwise it will sing its little song a second time, after which it is ready to take commands. Verify that the whine resumes if you release the trigger. All the lights below the computer deck should be solid green at this time (or maybe one solid yellow, the rest all green)..
6. Start your drive software. If the car starts to run away, release the "deadman" switch.
7. If left idle for any period of time, the ESC will chirp every couple seconds to remind you to turn it off.
8. The ESC will not restart even with the deadman switch closed if the LP/Arduino is sending out a motor control other than stopped. Either terminate your program (which if you did it correctly, resets all servos to their neutral position), or else the program should reset the servos when it detects that the car is stopped.
You can find other checklists in the TrakSim
documentation.
Any questions or comments? This is your project.
Tom Pittman -- Starting July 13 through the end of the 4-week workshop, use the email given on July 16 to reach me.
Rev. 2019 January 12