Although originally not part of the plan, steering a vehicle to stay within its lane came up as an alternate project for participants who preferred to hone their skills using other people's code instead of writing their own. I think the problem of steering an actual vehicle is more challenging than can be solved by neural nets (NNs) in a 4-week summer program, but not too hard for a design-based attack, so I proposed that as this year's project: using a radio-controlled model car, replace the radio receiver with a computer and a camera -- the same camera we used last year, so we can build on what we learned -- programmed in a high-level procedural language (Java, same as last year), again so we can "stand on the shoulders of giants" while still keeping in total control of what the software is doing.
I did some additional research on the mathematical foundations autonomous car projects are considering. It may be relevant but it's not particularly understandable -- I hope it's not my job to make it understandable -- but I added a brief explanation and some links here (below) so you can know and believe that your code is the best that is mathematically possible. Last year a couple of the participants went through all the math (which they found online) for picking objects out of a visual scene, and did an implementation based on the math, and discovered it was not significantly better (but substantially slower) than the ad-hoc heuristic the rest of the team was implementing. That suggests that what they were doing was indeed consistent with the math if not obviously so. That's a useful discovery.
Steve Edelman did a lot of research on the state of the art, and picked out a Traxxas 1:8 scale model car, which we were given to believe is the same model used at MIT in their autonomous car project -- actually Traxxas has a zillion different models and no well-defined model-naming scheme, so some of the dimensions and other particulars turned out slightly different from the MIT version, but not enough to make the project significantly harder or easier.
To this we added a single-board computer (LattePanda) running Windows 10 with an attached Arduino chip to drive the servomotors that control steering and speed, the same Chameleon3 camera we used last year, plus a battery or two to run the computer and camera from. Steve is a hardware guy, so perhaps by July he will have it all running from the same battery that powers the drive motor.
The Java camera glue code is in a zip file here on my website, or if you (meaning your browser) know the secret password, it's also available on GitHub. For the servos I posted the Java interface glue code source here on the LattePanda forum.
I wrote a track simulator that uses the same interfaces (as the camera and servos) but runs entirely in software, so you can test your (Java) self-driving software on what a real car would see on a real track if your software were really driving it (because crashing the simulated car is far cheaper than crashing a real car) which you can read about and download here. It puts up an image something like the short video loop I wrote last year (see it here), except that your software drives the simulated car, and the resolution matches the Chameleon3 camera.
From here on, my remarks are directed to helping you think about how to write code to drive the servos of a R/C model car. If you have some other project you'd prefer to do, let Steve know, and (if we can) between us we'll figure out how to enable you to do it .
This page may be updated from time to time before
July 16, as new ideas are suggested or new information becomes available.
You should watch the revision date (at the bottom)
to see if there is new information since the last revision (which I will
sometimes try to encode in green for easy visiual identification).
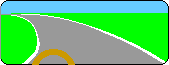
Given a view through the windshield of a car something like this, what should the driver (human or computer) do to the steering wheel?
a. Turn it to the left,b. Turn it to the right, or
c. Go straight ahead.
That's it! That's basically all there is, just have the program
decide whether to turn left or right (and how much), or else go straight,
based on what it sees in the camera image.
The general case turns out to be a harder problem, because you don't always have white lines along the edges, there might be parked cars instead, there might be a dotted center line with oncoming traffic. The road is probably not a nice even shade of gray -- if you're in a construction zone, the road could be any color at all, and almost certainly not uniform! But for this year's project, we can make some initial simplifications (as we did with the pedestrian project), to assume that the road varies somewhat through a range of shades of the same or similar colors, mostly unsaturated, mostly medium to dark. There will be white (or yellow) lines on both sides that your car must stay (approximately centered) within, but there may be gaps or irregularities in the lines. If (as I expect) we have time left over, we can work on following a single line on one side of the track, and/or inferring a line from the change in texture and color (parked cars, or unpainted, possibly dirt, road).
We will begin with a uniform moderate forward speed (slow enough so that you can run along beside it and pick the car up if it goes off-track), but if we have more time left over, we can add forward motion control, like stopping if the track ends or the car becomes confused (you might want to do this part early, for safety ;-) and speeding up for straight or gentle curves but slowing down for tighter curves. How does the steering change as the car speeds up? How does the processing time it takes your program to decide what to do affect how fast the car can safely go? Can you cope with pedestrians and stop signs and traffic lights? What if there's another car on the same track, can you avoid hitting it? What about a parked car covering part of the line? These are interesting questions and very relevant to driving a real car on a real street.
But let's get it working on the simplistic case first, then add complications.
The easy way to do this is to find the white lines in your image, then calculate the midpoint line between them, and then determine whether the relevant parts of that middle line are to the left or right of the car's visual centerline. You can set the steering angle proportional to how far off-center your calculated weighted average comes out.
Obviously, the part of the road near the horizon is completely irrelevant, you can decide what to do there after (and if) the car gets closer to that part of the road. So you need to think about how far down the road to consider, and how much weight to give the various parts of the image between there and here (the nearest part of the image, the bottom). How does the effective turn radius of the car affect that decision? Where on the image is that turn radius? How long does it take your software to analyze the image and decide what to do, and where will the car be (relative to the current image) when you are ready to look again? These are some of the questions you should consider.
How do you find the middle of the road from the image? I found one autonomous car project on the internet that had their software doing edge detection. If you study what is involved in edge detection, you will realize that there is substantial computation involved. Last year we looked for pedestrians without using edge detection. In fact, there was some smoothing to remove edges. Could that help you here? Notice that the lines are substantially lighter than the road. As far as I know, you never have black or red or blue lines on the road that the car is expected to follow. In some states (I have not seen it here in Oregon) they may occassionally alternate black and white paint for the dotted lines, but that's mostly to accentuate the dotted-ness of the lines on fresh (very pale) concrete: you still look for the white parts as defining the edge of your lane.
Recall that the image comes from the camera as rows of RGB
(red-green-blue) pixels. Do you care about the color? Yellow lines are
often used to signify the left edge of the forward-moving traffic lanes,
oncoming traffic will be to the left of the yellow line, but white lines
separate lanes going the same direction. For our purposes there is no difference,
and you can consider simple luminance. Last
year we needed to ignore luminance, now it's all we care about, but
it's computationally trivial to
pull it out of the RGB.
Steering has a center-zero, so applying a proportional correction (if the center line is to the left of center, turn left proportional to how far to the left it is) will maintain reasonable tracking. For velocity, zero is stopped, so your software needs to define an offset to aim for that is closer to your optimum speed. If your software estimate overshoots the optimum, you will oscillate, so you really want your velocity setting to approach the optimum asymptotically (as close as you can get, without crossing). The poster curve is exponential, where the derivative of (ex) is ex. Yes, calculus again. You might find ad-hoc estimation more robust and easier to understand, but you should think about the math a little, so when you make your presentation, the college professors in the audience (and on the admissions committee of the college you are applying to) will know that you've done your homework.
Anyway, the combination of Proportional correction + Integrated smoothing + the Derivative of the approach (PID) is used a lot for things like cruise control in real cars. Integration in hardware control systems is nothing more than adding up successive values, and the derivative is nothing more than the difference of successive values, so these are easy and fast to calculate. The hard part is knowing what to integrate or differentiate. There is no substitute for doing the math.
Here are some videos explaining PID and its math:
Controlling Self-Driving CarsPID Control -- A Brief Description (follow the link at the end for examples)
Understanding PID in 4 Minutes (silent, but includes math formulas)
I looked at Kalman filters, which are rather
less intuitive than PID. The math depends heavily
on statistics and matrix theory, neither of which I did much of in college
(I know the basics, but not much more), so if you understand statistics
and matrix theory and you want to do Kalman filters, and you need help,
we'll find you somebody who understands them better than I.
As near as I can tell, the basic idea of Kalman filters is that they offer very good Gaussian smoothing in the face of noise. The equations take into consideration noise in both the primary data and (independently) in your measurements, as well as a possibly changing control signal (your steering and acceleration plans) for predicting what those controls will do for the car position in the next sample frame. I found a couple of web pages that seemed to explain the math reasonably well:
Kalman Filter For Dummies
Me, I'm inclined to think you can get the
same (or better) effect from figuring out where the "sweet spot" of the
calculated centerline is (how far down the screen to look) and what the
gain should be there to get a good steering aim from the information. If
you make these numbers configurable starting with a reasonable guess, the
car will work but wander around in the lane a lot. You can then run what
used to be called "linear regression" -- today the same process is called
"neural nets" and is a lot messier computationally and takes a lot longer
to get good results -- to optimize the numbers for the hardware. Or you
can do it with cut-and-try and get almost as good results with hardly any
effort at all (because your brain is a lot smarter than any digital neural
net could ever be). But that's my opinion, your mileage may vary.
The second is visual odometry, which according to Noah Koontz, is the kind of thing now being done in First Robotics. You can make a good presentation on August 10 without any kind of odometry on 3D modelling, but it will be stunning if your code can track the car position in 3-space based on visual odometry.
The other two ideas offered in this assignment are more esoteric, but safe following distance is computable in the same way that staying in the lane is. Steve is trying to make sure we have two cars to work with, which makes this an interesting demonstration for August 10. Part of that safe following distance can be calculated from monocular depth estimation (inferring distance from successive images in a moving vehicle), so this is also relevant to what you are doing this year.
I think that some of you can understand the technical
issues taught at this Cornell course, and I would bet a few of you can
think of better (easier) ways to do the same things, so that you can have
it running before August 10. How about this for a throw-away line in your
presentation in Brussels: "Cornell graduate students ten years ago took
a whole semester to do what we did here in less than 4 weeks."
The early R/C cars used a single mechanism for controlling both the steering and the (internal combustion) engine power, a servomotor that perhaps was originally controlled by a voltage, but now they are all driven by a pulse-width modulation (PWM) signal that looks like this on an oscilloscope:

The pulse train is generally in the range of 20-50 Hertz (pulses per second), which is perfectly adequate for our needs. The pulse width varies ("modulates" = the "M" of "PWM") dynamically between 1 and 2 milliseconds, where 1ms is considered full left or full reverse, and 2ms is considered full forward or full right. This is explained in more detail here.
The R/C transmitters all multiplex (combine) several (typically eight) independent PWM trains into a single transmitted signal, one pulse from each channel, in a burst called "PPM", then repeat; the receivers take this apart and send the individual PWM signals out on separate wires (usually bundled together in flat 3-wire cables with ground and power: black or brown = ground, red = power, white or yellow = PWM signal) to their respective servos. The LattePanda computer we will be using has three PWM connectors on their motherboard driven by the Arduino daughter board, into which the standard servo cables plug directly.
Originally the gas-guzzler R/C cars controlled the fuel to the engine with a servo like the steering gear, but when they went to electric motors, some clever engineer figured out how to build a single electronic circuit called "electronic speed control" (ESC) that takes a servo PWM and translates it into the 3-phase analog signal that brushless motors need. So we software people only need to worry about producing a PWM pulse train with the correct pulse width in both cases.
In fact on the LattePanda we don't even need to do that, because the
vendor has supplied an open-source Arduino program (Firmata)
which does all the pulse train control, and it needs nothing more than
a sequence of 3-byte commands (the standard MIDI
protocol) sent over a serial port. Java does not have a standard
serial port interface API, but there are several implementations
that follow an early aborted attempt, and at least one of them (JSSC
= Java Simple Serial Connector: they don't have their own website, but
Google gets you their GitHub page) seems to work reasonably well. LattePanda
implemented the required servo
API as a set of C#
library calls which they provided the source code for, and I translated
what we needed into six Java APIs. My source code
with examples is posted on the LP
website user forum. I expect to have an updated package of driver code
available here before July.
An important way to partition the tasks of complex software development is to divide them along the natural fracture plane between hardware and software. Obviously everything you write is software, but some of that software is controlling the hardware, and other software is making high-level decisions based on the images the hardware gives you. That's a natural fracture plane. Basically that means you might have one or more team(s) doing the high-level decision-making code, and another team doing the servo control driven by outputs from the decision-making software.
Then, if it interests any of you, you could have yet another team developing a simplistic driver as an alternate input to the servo control component -- possibly taking input from a user interface like a joystick or game steering wheel, or else simple mouse motion or clicks. This way when (not if) things don't work, you know whether the problem is at the decision-making level or down at the hardware control level.
Last year I prepared in advance a Java interface to the camera we were using. This year I wrote a simulator (TrakSim, available here) that pretends to be that same camera + the servos you will be controlling in the car, so that as your software steers the car, the image it produces follows what an actual car on the specified track would (more or less) see. An updated camera driver is included with the TrakSim download.
Any questions or comments? This is your project.
Next time: Software Components and Team Assignment
Tom Pittman -- Starting July 13 through the end of the 4-week workshop,
use the email given on July 16 to reach me.
Rev. 2019 January 31 (video link added 20 Feb.13)